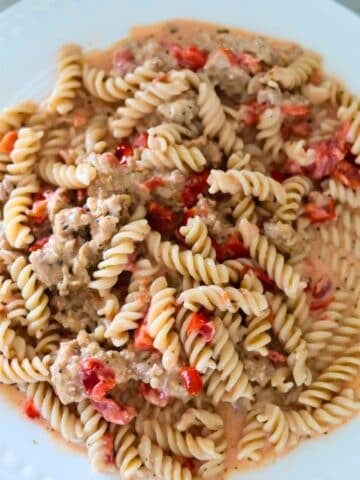
These fluffy gluten-free protein waffles are going to become your new favorite. They are fluffy, they are moist, they come together in minutes, and they are perfect for meal prep. This recipe is also dairy free, but can also be made using regular milk.

Quick Look: Gluten-Free Protein Waffles
- ⏱ Prep Time: 10 minutes
- 🔥 Cook Time: 10 minutes
- ⏳ Total Time: 20 minutes
- 🧇 Servings: 6 waffles
- ⚡ Calories: 360 calories per waffle
- 🍂 Flavor Profile: Fluffy, moist and just a hint of sweetness
- 👌 Difficulty: Easy - Restaurant level flavor, without leaving your own kitchen
SUMMARIZE & SAVE THIS RECIPE ON:
Having a good gluten-free waffle recipe is like finding 1 million dollars when you have celiac disease. Well, not quite $1 million but close enough!! I love having waffles made and ready to go in the fridge and freezer. Since not all gluten-free bread, have the perfect texture, gluten-free waffles can become your new best friend. I use these waffles to make sandwiches, egg, sandwiches, and even pizzas! I guarantee this gluten-free waffle recipe will become a new staple in your house!
Jump to:
Ingredients
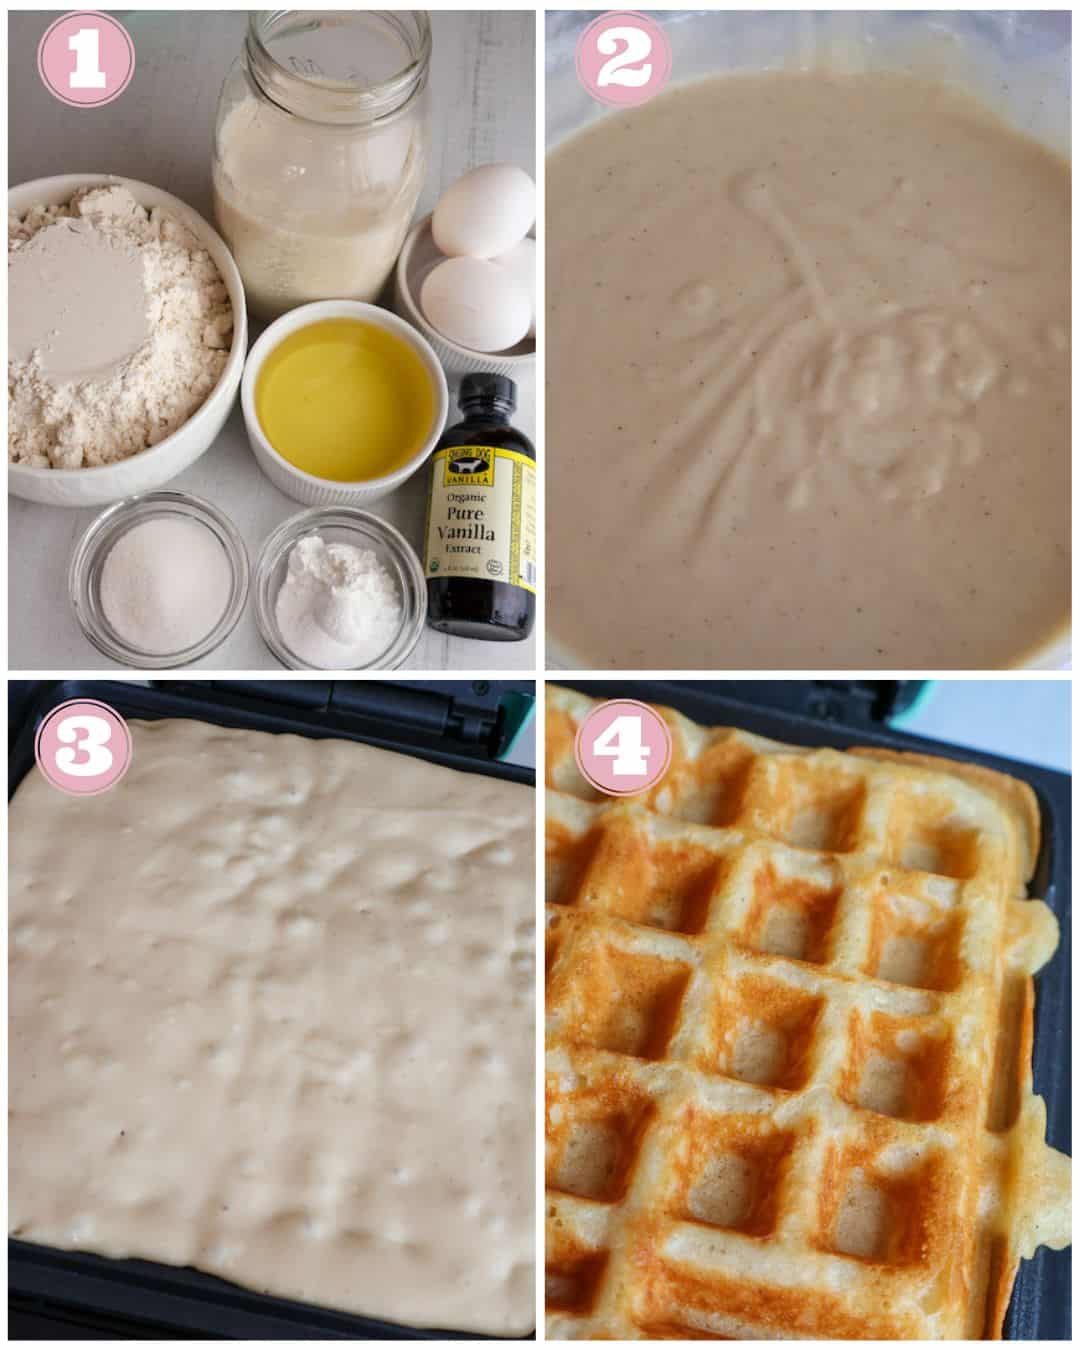
See the recipe card at the end of the post for a full list of ingredients and their exact amounts.

- Gluten-free flour: For this recipe, I am using Bobs, red mill gluten-free one-to-one baking flour. I haven’t tested them with other brands, and cannot guarantee the same results.
- Vanilla extract: No waffle is ever complete without the subtle flavor that vanilla extract offers.
- Salt: Salt will help the waffles rise resulting in fluffier waffles.
- Baking powder: All helping to create our fluffy texture.
- Eggs: These help to bind everything together and lend amazing texture.
- Almond milk: The milk in these waffles acts as a binding agent and adds a level of richness that you just can't obtain with water alone.
- Sugar: Just a small amount goes a long way in this waffle recipe.
- Oil: I like to use olive oil to keep these waffles more on the healthy side.
How to Make Gluten-Free Protein Waffles
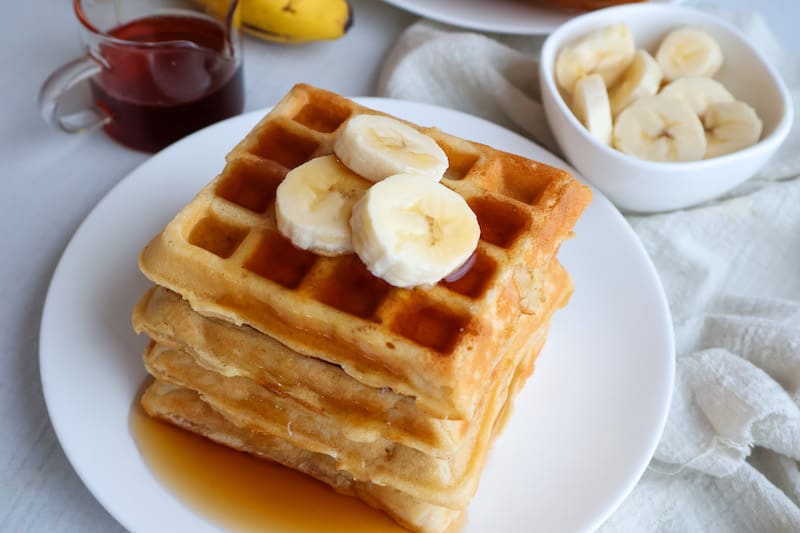
- Preheat and coat the waffle maker with coconut oil or olive oil. I like to use a pastry brush.
- In a large mixing bowl, combine and whisk all dry ingredients.
- Next, in a separate bowl, add your eggs, almond milk, olive oil, and vanilla extract. Using a whisk, mix until combined.
- Then, pour the dry ingredients into the wet ingredients. Mix until combined but be careful not to over-mix.
- Once the waffle iron is heated, pour batter onto the iron. About ¼-1/3 cup of batter per waffle.
- Cook until the light goes off on the waffle maker. If yours does not have a light, cook until the top is golden brown. Usually between 3 and 5 minutes.
- Carefully remove the waffle from the waffle iron using a slotted spatula. Repeat until all mixture is gone.
Expert Tips
- Flour: This recipe has been tested with bobs red mill gluten-free 1:1 flour.
- Measuring flour: While not all gluten-free flours are created the same, 1 cup of bobs red mill flour weighs 150 grams. I highly recommend weighing the flour when measuring to keep the waffles from being too dense.
- Room Temperature Ingredients: The short explanation is that this helps batters come together and blend beautifully, whereas cold ingredients do the opposite, they can turn your batter into a curdled lumpy mess.
- Dairy: This recipe is made with almond milk, however, you can simply replace the almond milk with regular milk, oat milk, or even flax milk.
- Sugar: This recipe calls for 2 tablespoons of regular sugar. If you are trying to keep this recipe, refined sugar, free, simply use cane or coconut sugar.
Storage
If you're only storing waffles for a day or two, you can simply place them in an airtight container and store them in the refrigerator. You can reheat them in a toaster or oven as needed.
Equipment
Use a waffle maker for this recipe for the best results.
Gluten-Free Protein Waffles FAQ's
Yes, these gluten-free waffles are perfect for freezing. Simply wrap the waffles two at a time in freezer wrap. Then place the waffles into a freezer, safe Ziploc bag, or airtight container. Be certain to put the date on the package and freeze it for up to three months. When you are ready to use them, removed them from the freezer, take off the freezer wrap, and place them in the toaster.
Wrap the waffles gently in a paper towel, then place them in an airtight container in the fridge. You can leave these in the fridge for up to four days. Remove from fridge and place in the toaster when you are ready to serve.


★ Did you make this recipe? Don't forget to give it a star rating below! I would love to hear back from you! You can also FOLLOW ME on Instagram, Pinterest, Facebook, and TikTok for more delicious recipes.
📖 Recipe

Gluten-Free Protein Waffles
Video
Equipment
Ingredients
- 2 cups 1:1 flour gluten free
- 3 teaspoon baking powder
- 2 tablespoon sugar
- ¼ teaspoon salt
- 1 teaspoon vanilla extract singing dog vanilla
- 2 eggs
- ½ cup olive oil
- 1 ¾ cup plus 2 tablespoon almond milk unsweetened
- ¼ cup protein powder
Instructions
- Preheat and coat waffle maker with coconut oil or olive oil. I like to use a pastry brush.
- In a large mixing bowl, combine and whisk all dry ingredients.
- Next, in a separate bowl, add in your eggs, almond milk, olive oil and vanilla extract. Using a whisk, mix until combined.
- Then, pour dry ingredients into the wet ingredients. Mix until combined but careful not to over mix.
- Once the waffle iron is heated, pour batter onto the iron. About ¼-1/3 cup of batter per waffle.
- Cook until the light goes off on the waffle maker. If yours does not have a light, cook until the top is golden brown. Usually between 3 and 5 minutes.
- Carefully remove the waffle from the waffle iron using a slotted spatula. Repeat until all mixture is gone.

Holley Meadows says
Great recipe! I did half of the recipe, and it made 8 waffles in my Dash mini waffle maker. So a full recipe would make 16 small waffles. Great recipe for meal prep for my kids. I plan on keeping leftovers in the freezer for busy mornings. While the protein content isn't that high, my kids would happily dip them into a honey-sweetened Greek yogurt to up the protein content.
Nicole Kendrick says
Sounds like they were protein packed perfection! Thanks for giving the recipe a try!
Bree says
These came together quick and the whole family loved them!
Nicole Kendrick says
Great to hear the recipe works as written! Enjoy the yummy breakfast!
Maureen says
I made these waffles I couldn't get over how fluffy they were. I halved the
recipe and got 6 waffles out of it. They were soo good!
Nicole Kendrick says
So glad to hear that you enjoyed!!! Thanks!
Swathi says
The gluten free protein waffles is delicious I have made it for our breakfast.
Nicole Kendrick says
The BEST breakfast option! Enjoy!
Harry says
My family loved this!
Nicole Kendrick says
So glad you all enjoyed!Thanks for trusting in Golden Grace Kitchen!
Andrea says
My kids loved these! I'm always trying to find good recipes with extra protein.
Nicole Kendrick says
You have come to the right spot! We have SO many great options! Enjoy!