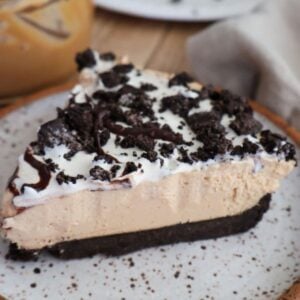
This no-bake, Oreo peanut butter pie is the ultimate dessert for any gathering. It’s a chocolatey Oreo crust, with a creamy peanut butter center then topped with additional Oreos and whipped cream. It’s a creamy, silky smooth peanut butter over a crisp Oreo crust. What’s not to love?

Quick Look: Oreo Peanut Butter Pie
- ⏱ Prep Time: 20 minutes
- ❄️ Cooling Time: 1 hour minutes
- ⏳ Total Time: 1 hour 20 minutes
- 🍫 Servings: 12 slices
- ⚡ Calories: 379 calories per serving
- 🍂 Flavor Profile: Sweet peanut butter flavor topped with crunch cookie sandwich
- 👌 Difficulty: Easy - A frozen dessert that is sure to impress
SUMMARIZE & SAVE THIS RECIPE ON:
This peanut butter Oreo pie is made gluten-free by using gluten-free Oreos as the base. For this recipe in particular I did use full dairy cream cheese and cool whip, however, it can be made dairy free by using dairy-free cream cheese and dairy-free whipped cream. If you decide to go the dairy-free route, I recommend Kite Hill cream cheese and So Delicious Coco whip. For the Oreo crust, I do use a plant-based, dairy-free butter.
Besides the fact that this Oreo peanut butter pie is delicious, it requires zero baking time. You can put this No Bake Oreo Peanut Butter pie together the night before a gathering, let it sit in the fridge, and pull it out when you are ready to go. This recipe screams convenience!
Jump to:
Why You'll Love This Recipe
- No Oven Required: To make this no-bake Oreo peanut butter pie you do not need to turn on the oven. You can easily make the crust and set it in the refrigerator for 30 minutes before filling it with your peanut butter mixture. However, if you would like to turn on the oven, you do have the option of baking it at 350°F for 10 minutes. Then allow the crust to cool for at least 30 minutes before pouring in the peanut butter mixture.
- Quick and Easy: With just 6 ingredients and 5 minutes, you can have this no-bake Oreo peanut butter pie setting in the refrigerator. It's the perfect dessert to pair with an equally easy dinner like this Marry Me chicken soup.
- Less sugar: Since we are using maple syrup for the bulk of our sweetener, you can feel less guilt when indulging in this peanut butter pie.
Ingredients

- Oreos: For this recipe, we are using gluten-free Oreos as our pie crust. If you are very short on time, you can buy a premade pie crust to make this recipe move along even quicker.
- Dairy-free butter: Dairy-free butter will help to hold together the gluten-free Oreos together as our pie crust. If you do not have any issues with dairy, you can feel free to substitute dairy-free butter for full-dairy butter.
- Peanut butter: Be sure to choose creamy peanut butter that doesn’t have a lot of liquid on top. Otherwise, this will result in a runny pie.
- Cool Whip: For this Oreo, peanut butter pie I do use a full dairy, Cool Whip, however, a dairy-free one will work just as well.
- Cream cheese: Cream cheese is going to lend a creamy texture to our peanut butter pie. Again, I am using dairy for my cream cheese, however, you can use a dairy-free cream cheese.
- Maple syrup: Maple syrup is used in this recipe to keep it lighter in sugar.
- Powdered sugar: If you are ok, with a little bit of sugar, 2 tablespoons of powdered sugar is added to this recipe, but not needed and is totally optional.
Instructions
- Using a food processor or blender, place your Oreos and melted butter into the bowl. Pulse until completely broken down.
- Pour the Oreo mixture into the pie pan and press down into the bottom and along the sides.
- For a no-bake pie crust, place this in the refrigerator for 30 minutes.
- For a baked pie crust, preheat the oven to 350 °F. Once the oven reaches temperature, place the pie crust into the oven and bake for 10-12 minutes. Remove from the oven and place onto a baking rack. Allow this to cool for at least 30 minutes before adding your peanut butter mixture.
- In a large bowl, combine your cream, cheese, peanut butter, and maple syrup. If you are using powdered sugar, add that at this time as well. Using a hand mixer, mix until creamy.
- Then, fold in the container of Cool Whip. Using the same hand mixer, mix until creamy.
- Lastly, add the peanut butter mixture to the pie crust. Spread this evenly over the pie crust. You may top it with any additional Cool Whip or Oreos at this time.
- Cover the pie and place it in the refrigerator for 3 to 4 hours, or overnight.


Storage
To store this pie, simply cover it completely and place it in the refrigerator. This pie will last for 4 to 6 days in the refrigerator.
Expert Tips
You can easily control the amount of sugar in this Oreo Peanut Butter Pie. By using peanut butter that is lower in sugar, you will already be removing a large amount of sugar. Then, we are using Maple syrup as our sweetener in this pie. I did add 2 tablespoons of powdered sugar since I was giving this to the neighbors, but this addition is completely optional and not needed to enjoy this pie.

Oreo Peanut Butter Pie FAQ's
Absolutely, you can place this peanut butter pie into the freezer. If you are placing it into the freezer, leave it in for just about two hours. If you leave the pie overnight, you will end up with a frozen pie. However, some people do enjoy this peanut butter pie as a frozen pie.
Absolutely, you can make this Oreo peanut butter pie ahead of time.
Certainly, if you are short on time, a premade, store-bought pie crust will work just fine for this peanut butter pie.


★ Did you make this recipe? Don't forget to give it a star rating below! I would love to hear back from you! You can also FOLLOW ME on Instagram, Pinterest, Facebook, and TikTok for more delicious recipes.
📖 Recipe
Oreo Peanut Butter pie
Equipment
Ingredients
- 24 oreos
- 6 tablespoon dairy free butter Melted (not too hot)
- 8 oz cream cheese (1 package) - softened
- (1) 8 oz package cool whip thawed
- ¾ cup creamy peanut butter
- ¼ cup Maple Syrup
- 2 tablespoon powdered sugar optional
Instructions
- Using a food processor or blender, place your Oreos and melted butter into the bowl.
- Pulse until completely broken down.
- Pour the Oreo mixture into the pie pan and press down into the bottom and along the sides
- For a no bake pie crust, place this into the refrigerator for 30 minutes.For a baked pie crust, preheat the oven to 350° ℉.
- Once the oven reaches temperature, place the piecrust into the oven and bake for 10-12 minutes. Remove from the oven and place onto a baking rack.
- Allow this to cool for at least 30 minutes before adding your peanut butter mixture
- In a large bowl, combine your cream, cheese, peanut butter, and maple syrup. If you are using powdered sugar, add that at this time as well. Using a hand mixer, mix until creamy.
- Then, fold in the container of Cool Whip. Using the same hand mixer, mix until creamy.
- Lastly, add the peanut butter mixture to the pie crust. Spread this evenly over the pie crust. You may top with any additional Cool Whip or Oreos at this time.
- Cover the pie and place it in the refrigerator for 3 to 4 hours, or overnight.


Cristina says
This Oreo peanut butter pie came out creamy, sweet, and super easy—such a fun dessert to make without much fuss.
Nicole Kendrick says
Easy desserts are our specialty! Thanks for the love, Cristina!
Swathi says
Oreo peanut butter pie is delicious I have made it, so good, I am going to make it again.
Nicole Kendrick says
A little chocolate, a little peanut butter and a whole lot of perfection! Thanks!
Jane says
You can't go wrong with oreos and peanut butter! My kids requested I make this one again and again.
Nicole Kendrick says
Couldn't agree more! Thanks so much for stopping by, Jane!
Liz says
I can never resist the chocolate-peanut butter combo and this pie was no exception!! The family inhaled it!!!!
Nicole Kendrick says
This one never lasts long at my dinner table either! Have a great day, Liz!
Brett says
I can't believe something that was so simple to make could taste so good. It did not last long in our house!
Nicole Kendrick says
It never lasts long for us either, lol! Thanks for the positivity, Brett!
Michelle Heinitz says
I made this pie, and I haven't made a pie in 4 years ever since being diagnosed with celiac.
OMG😍😍😍
This pie is so yummy! Definitely going to be a staple in our house!
You need to try it!!!
NKendrick says
LOVE to hear this!!! So happy you enjoyed it!!